19 August 2025
Personal VPN service based on a VPS server
In the present online time, keeping safe and private on the web has turned into a very big job.
A private network that is virtual (VPN) is a strong tool for reach this aim. OpenVPN, a public source fix, is known for its trust and bendability
In this simple guide we will see the steps for putting in OpenVPN on a virtual Private server (VPS) Whether you are an IT fan, a system manager, a small business owner or just want to set up your VPN servic͏e this step by step guide helps you make a safe VPN link on your VPS.

What is the benefit of using a VPN on your server?
- ◆ The first is the cost. In many cases, renting a VDS with a minimum tariff costs less than subscribing to a ready-made VPN service in the company (except for questionable options with broken or shared accounts). In addition, the virtual server can be used for other tasks at the same time, and it can be fully customized to your needs, including the ability to disable logging.
- ◆ The second is geographical proximity. ForexBox hosting hosts servers in the Netherlands and Poland, which provides low ping and stable connection.
- ◆ The third is a dedicated IP address. You will be the only user of the server and will receive two addresses: IPv4 and IPv6.
- ◆ The fourth is the absence of restrictions on the volume of traffic.
To create a VPN service on a VPS, follow these steps:
- 1. Rent a virtual server.
- 2. Connect to the VPS via an SSH client.
- 3. ͏Install and configure an OpenVPN server on a VPS.
- 4.͏ Create a VPN connection.
- 5. Check the functionality of the VPN connection.
1. Virtual server rental
A virtual dedicated Server (VPS/VDS) is a type of hosting where a part of a physical server is leased using virtualization technology. Renting a VPS is much cheaper than renting an entire physical server, while they are practically not inferior to each other, you can set up your VPN anyway.
At ForexBox, customers can rent a VPN VPS in two locations — in the Netherlands and Poland. The price of the service starts from €6.37 per month.

VPN - €6.37/1m
- ◉ Speed: Up to 1 Gbps
- ◉ Protocols: OpenVPN, ThreeX-UI
- ◉ Location: Netherlands
- ◉ Encryption: AES-256
➛ Order
Then you need to select a service, register and make a payment.
After activation and payment confirmation, the login information for the server will be sent to your email: username, password and IP address.
2. Connecting to a VPS via SSH client
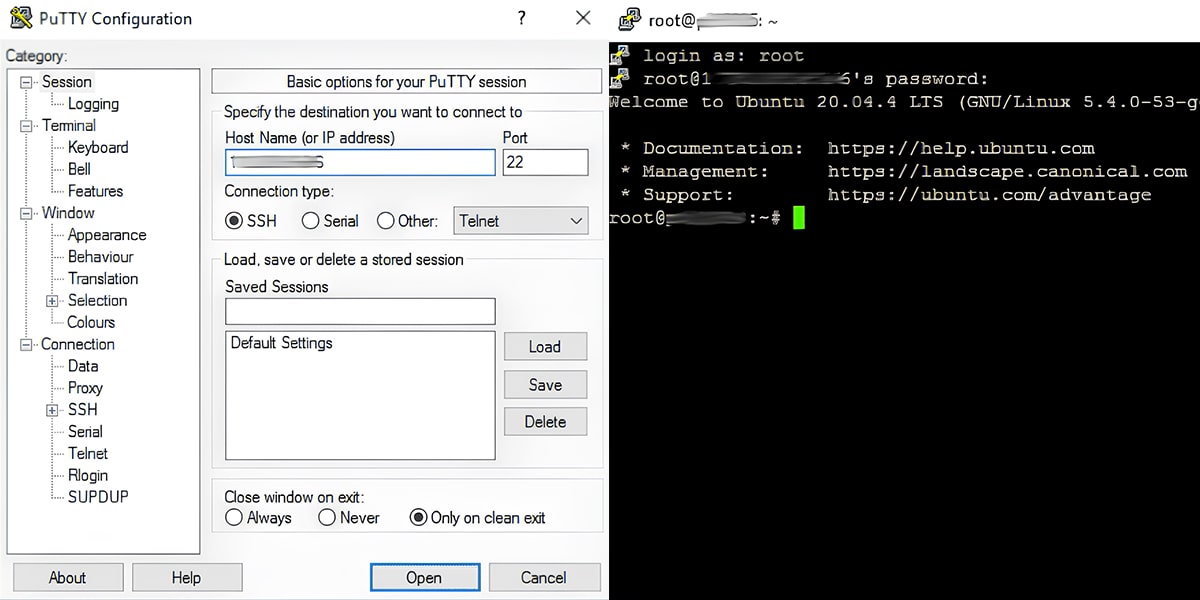
To connect to the VPS, open the SSH client through the PuTTY program and fill in the fields:
- ◈ Host Name (or IP address) — specify the IP address of the VPS.
- ◈ Port — enter port 22.
- ◈ Connection type — select the SSH connection type.
Press the Open button to establish a connection.

After connecting, a command line will appear *login as: — enter the user's name (login) and click Enter.
After that, a line will appear like *login@IP-адрес password:— enter the password and press Enter again. Note that when you type, the password is not visible on the command line.
If the info is wrote right there will be a note in client window l͏ike *\[login@VPS server name]* where you can put commands.

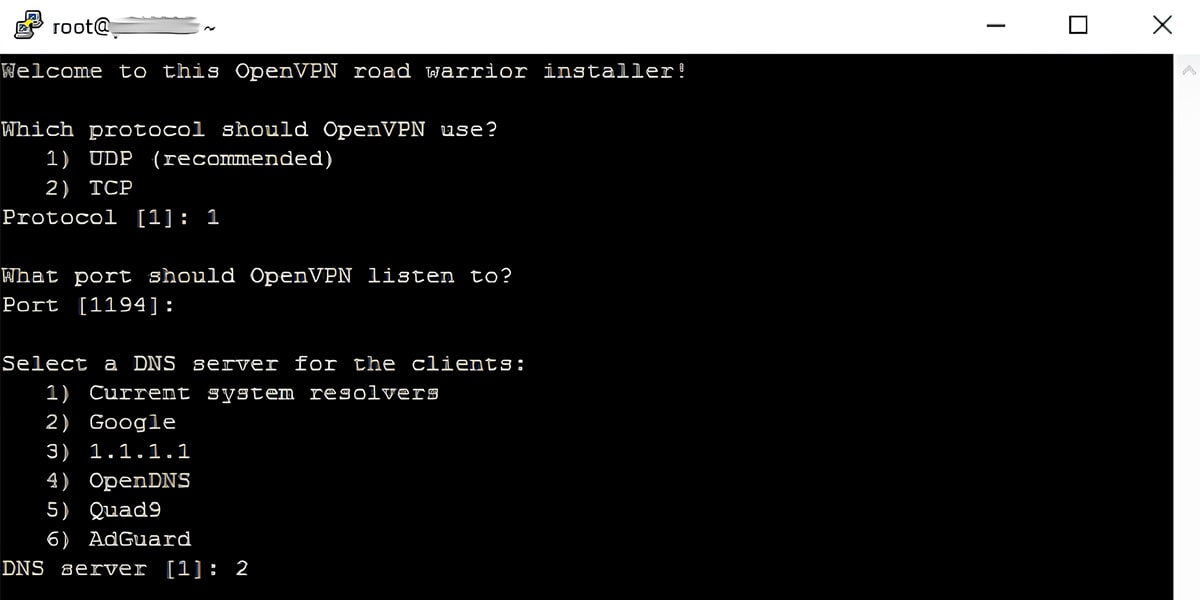
3. Installing OpenVPN on a VPS
Now that your VPS is set to go, you can move on to put in OpenVPN.
Change info about boxes. First, change the box info in the server Run the command:
- ➛ sudo apt
Then install OpenVPN:
- ➛ sudo apt install openvpn
Move the OpenVPN setup files to the right folder:
- ➛ sudo cp -r /usr/share/doc/openvpn/examples/easy-rsa/ /etc/openvpn/
Go to the EasyRSA catalog:
- ➛ cd /etc/openvpn/easy-rsa
The Public Key Infrastructure (PKI) is here, that is used for safe cards.
Initialize the PKI:
- ➛ sudo ./easyrsa init-pki
This command will let you make a papers.
Create a Certificate Authority (CA):
- ➛ sudo ./easyrsa build-ca
Generate the server and client certificates:
- ➛ sudo ./easyrsa gen-req server nopass sudo ./easyrsa sign server server sudo ./easyrsa gen-req client nopass sudo ./easyrsa sign client client
Configuration of OpenVPN on VPS
Now that OpenVPN is set up and th͏e papers are made, lets begin to set it up.
- ✦ Step 1 - make the setup file of a OpenVPN server.
Open the settings text fileas an editor.
- ➛ sudo nano /etc/openvpn/server.conf
Add this content to it (if necessary, change the parameters):
- ➛ port 1194 proto udp dev tun ca /etc/openvpn/easy-rsa/pki/ca.crt cert /etc/openvpn/easy-rsa/pki/issued/server.crt key /etc/openvpn/easy-rsa/pki/private/server.key dh none topology subnet server 10.8.0.0 255.255.255.0 push ""redirect-gateway def1 bypass-dhcp"" push ""dhcp-option DNS 8.8.8.8"" push ""dhcp-option DNS 8.8.4.4"" cipher AES-256-CBC user nobody group nogroup
This file has the key parts: port, way to talk, ways to hide info, and setup of the network.
- ✦ Step 2 - Enabling IP Forwarding
Open the file /etc/sysctl.conf and add a line or take away a note:
- ➛ net.ipv4.ip_forward=1
Apply the changes:
- ➛ sudo sysctl -p
This lets the server send data between a VPN and an outside network.
Configuring Firewall Rules
To let VPN flow go through a firewall, you must set up iptables.
Enabling NAT (Network Address Translation):
- ➛ sudo iptables -t nat -A POSTROUTING -s 10.8.0.0/24 -o eth0 -j MASQUERADE
This command lets VPN users reach the web via your server.
Saving iptables rules:
- ➛ sudo iptables-save > /etc/iptables/rules.v4
Now the rules w͏ill function on their own each time you start again.
Launching and managing the OpenVPN service
Launch OpenVPN:
- ➛ sudo systemctl start openvpn@server
Automatic startup at boot:
- ➛ sudo systemctl enable openvpn@server
Checking the service status:
- ➛ sudo systemctl status openvpn@server
This command will show the present state of OpenVPN and let you check if the server is working good, and accept connections.
4. Installing and launching the OpenVPN program
In the "File" section, drag and drop the file with the username that was saved on the desktop onto the program window. Then click Connect.
The connection is established! To check, open a web browser and use any service to determine the IP address. As you can see, the IP address of your server is now displayed, which is used as your own.
This completes the setup!
5. Ch͏ecking your VPN connection
To look at the VPN server's work, go to the site https://whoer.net and see your IP address. If all is done right, the number of your VPS server will show in "My IP" field.
We remind you that the VPS for OpenVPN is available for only €6.37 per month.

VPN - €6.37/1m
- ◉ Speed: Up to 1 Gbps
- ◉ Protocols: OpenVPN, ThreeX-UI
- ◉ Location: Netherlands
- ◉ Encryption: AES-256
➛ Order
Fixing common problems
Making OpenVPN can be a hard job, and there is often many troubles on the way. Here are helpful tips to fix the most usual issues that might happen when you work with OpenVPN.
- ✦ Firewall Rules
Sometimes firewall settings interfere with VPN operation. To ensure a stable connection:
Check the firewall rules. Make sure that OpenVPN traffic is correctly allowed on your VPS, erroneous settings may block communication between VPN clients and the server.
- ✦ Log Files
OpenVPN keeps clear logs with useful fixing info.
See the logs in the /var/log/openvpn/ folder. They can have a lot of mistakes that can help you find and fix problems with settings.
- ✦ Problems with certificates
Certificates are the basis of OpenVPN security. Errors in their configuration can lead to authentication failures and connection disconnection:
Look at the truth of the papers and their ways, which are listed in the setup files of a server and client. Errors or wrong links can break the way to make a connection.
- ✦ Port and protocol
The pick of port and way (UDP or TCP) is key in setting up chat:
Make sure the ͏client setup uses the same port and type as the server. A mix-up in the settings can lead to not being able to connect.
- ✦ Network conflicts
There can be fights if a VPN IP range clashes with the numbers in your home network:
Make sure that the area for a VPN (like 10.8.0.0/24) does not cross over with the IP addresses used by local network. Otherwise, it may cause routing and connection problems.

Conclusion
Now you know how to set up your VPN using a VPS server.
Any other questions?
Contact the technical support of ForexBox — our specialists are always ready to help you if you encounter difficulties in setting up our company's servers.


